You are using an out of date browser. It may not display this or other websites correctly.
You should upgrade or use an alternative browser.
You should upgrade or use an alternative browser.
Dave's AT FlipPac Thread
- Thread starter Dave
- Start date
- Status
- Not open for further replies.
Engel Fridge

The Engel 12V fridge freezer completely changed the way I travel. No more soggy bread, wet food or running out of ice and... no more warm beverages! The days of draining the water out of my cooler or wondering how much longer that food will keep are long gone, and my beer is always ice cold even in 110 degree weather.Engel Fridges are relatively light weight, draw minimal current, and operate well at the extreme angles often encountered in off road vehicles. The MT-45 also makes a handy and reliable mini refrigerator or freezer for the garage because they run just as easily off your home 110 circuit.


Volume: 43 Qts
Power Consumption: Variable from 0.7-2.5 Amps (12V DC)
Power Source: 12V/24V DC & 110V AC
Internal Dimensions : 15.4" x10.8" x 16.4"
External Dimensions : 25.5" x 14.3" x 20" (excludes hands = 1.5” each)
Net Weight : 66lbs
Features:
The biggest issue with any 12V fridge is - where to put it?
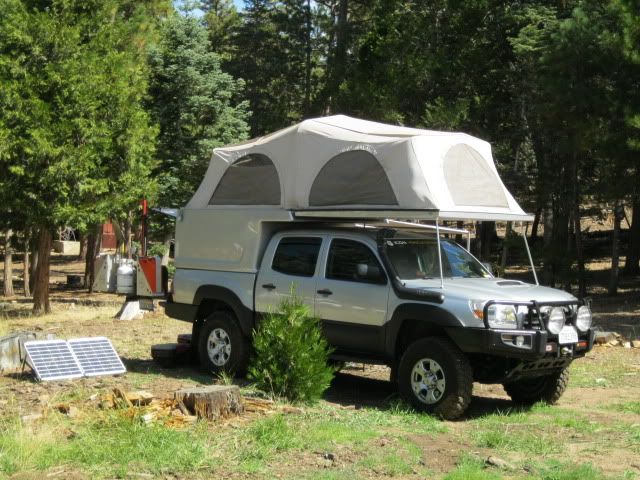
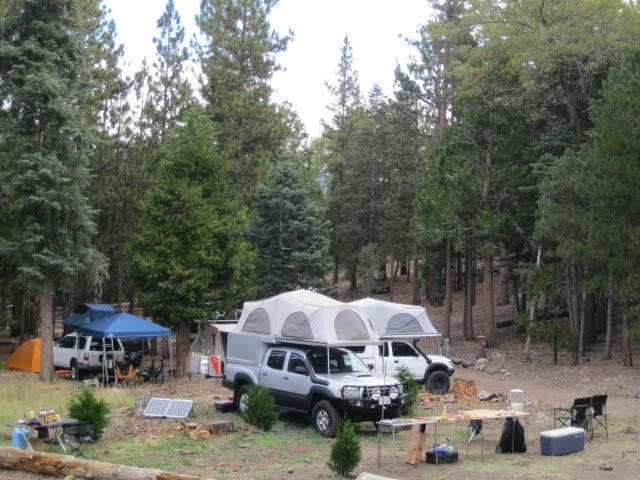
An appliance like this deserves to be out of the elements and secure from dust, moisture etc as well as UV damage, it is best kept out of the elements. For a while I ran a platfrom inside the cab of the truck with the fridge mounted to the hard base that Engel makes but we ended up needing that seat back. Mounting inside the cargo area of a Land Cruiser or inside a shell is ideal in my opinion, the challenge then becomes how to protect it from cargo so I designed and built my camper interior primarily around the main items I would be carrying like the 12v fridge, toilet and dry goods storage. Pics below:


Ready to go!
A good 12v fridge will keep ice cream or ice frozen if needed and can keep your favorite beverages at 33 degrees even in the desert - no worries!
The Engel 12V fridge freezer completely changed the way I travel. No more soggy bread, wet food or running out of ice and... no more warm beverages! The days of draining the water out of my cooler or wondering how much longer that food will keep are long gone, and my beer is always ice cold even in 110 degree weather.Engel Fridges are relatively light weight, draw minimal current, and operate well at the extreme angles often encountered in off road vehicles. The MT-45 also makes a handy and reliable mini refrigerator or freezer for the garage because they run just as easily off your home 110 circuit.
100% CFC-free, the Engel Freezer Fridges are powered by an advanced swingmotor design. The Engel "swing compressor" by Sawafuji is internationally patented and is considered the most reliable compressor on the market today, as it contains only one moving part! The swing motor is an electrodynamic reciprocating device that connects directly to the compressor's piston, providing great economy and allowing compact size, light weight, and efficient power consumption. In fact, the Engel MT-45 draws just 2.5A at freeze.Proven service in the remote areas of North America, Australia, Africa, Europe, and the Middle East led to my purchase of an Engel fridge back in 2006. It has been a solid performer with zero issues since my purchase.
Engel MT-45 Fridge/Freezer Specs:Volume: 43 Qts
Power Consumption: Variable from 0.7-2.5 Amps (12V DC)
Power Source: 12V/24V DC & 110V AC
Internal Dimensions : 15.4" x10.8" x 16.4"
External Dimensions : 25.5" x 14.3" x 20" (excludes hands = 1.5” each)
Net Weight : 66lbs
Features:
- AC/DC Compatible
- Power Consumption: 0.7 - 2.5 Amps (at 12V DC)
- Variable Temperature Control
- Incline Operation up to 30° off level
- Automatic Voltage Selection between AC and DC power
- Highly Efficient Swing Motor Compressor - Low Amp Draws (even at start-up)
- Solar Compatible
- Removable hinged lid
- 100% CFC-Free Compressor
- Vibration Resistant for Extreme Conditions
- Efficient Cooling (independent from ambient temperature)
- AC and DC cord included
- Interior Wire Basket included
- Galvanized Steel Outer Case with Melamine Coating
- Heavy-Duty removable Handles
- UL Approve
The biggest issue with any 12V fridge is - where to put it?
An appliance like this deserves to be out of the elements and secure from dust, moisture etc as well as UV damage, it is best kept out of the elements. For a while I ran a platfrom inside the cab of the truck with the fridge mounted to the hard base that Engel makes but we ended up needing that seat back. Mounting inside the cargo area of a Land Cruiser or inside a shell is ideal in my opinion, the challenge then becomes how to protect it from cargo so I designed and built my camper interior primarily around the main items I would be carrying like the 12v fridge, toilet and dry goods storage. Pics below:
As you can see, no space is wasted and provisions have been made for modular loads to suit the trip. I used the Engel Fridge slide so that I can pull the fridge out of it's protected position for easy access. I have since upgraded the lighter OEM straps to a set of heavy duty Buffalo Straps from Tembo Tusk.
Fridge is protected and secure with this arrangement allowing a second level of storage enabling maximum use of the shell.
Ready to go!
A good 12v fridge will keep ice cream or ice frozen if needed and can keep your favorite beverages at 33 degrees even in the desert - no worries!
Last edited:
I chose the National Luna Power Pack as a plug and play solution to all my house power needs for the camper. Unlike other dual battery options, it came with EVERYTHING needed for install right out of the box - it includes premium wiring and all the required fittings right down to the last zip tie.
The Portable Power Pack features fused accessory plugs, a polarized high-power plug and built-in battery monitor with low-battery and over-charge warnings. The built-in plugs can be used for low-power accessories such as refrigerators, pumps, compressors, lights and other 12-volt electronic devices. The high-current input-output can be used for higher power requirements such as invertors or battery chargers. The built-in split-charge isolator is fully automatic and does not require additional hardware in the application vehicle.
Some of the features I like:
- Simple installation
- Removeable / Portable design
- Fully automatic split-charge isolator
- Built-in battery monitor and input voltage monitor
- Remote battery monitor port (for remote dual battery controller)
- Slide-lock lid
- Bolt-down / Strap-down design
- Electronics isolated from battery compartment
- Can accomodate standard automotive battery types
- 7-meter heavy-duty cable supplied with attached coupler
- Fuse-protected plugs and connections
- Battery hold-down bracket supplied
- In-line fuse supplied
LED camper lights and any future electrical additions now have a safe source of power. The Engel 12V fridge will be plugged into the 12v outlet on front of the power pack.
National Luna Power Pack dual battery system is connected to the alternator and powers the 12V fridge, LED lighting and other camper needs.
NATIONAL LUNA DUAL BATTERY REMOTE MONITOR
The Dual battery controller is specifically designed to be combined with the National Luna split-charge systems (Intelligent Solenoid or Portable Power Pack). This model allows the user to over-ride the split-charge system’s built-in timer, useful for winching or start assistance when the main battery is too low.
- Simple installation
- 2 individual battery displays
- Excessive discharge warning
- Over-charge warning
- Polarity protected
- Extremely low power consumption
- 11.4V to 15V operation (ideal for automotive use)
- Programmed for non-linear lead-acid battery characteristics
- Audible alarm as standard (can be muted)
- Display on/off feature (Sleep mode)
- Recessed version available for panel-mounting
- 3.5-meter cable (standard)
ODYSSEY BATTERIES
I chose the Odyssey PC1700 MJT as the house power battery because of it's ampacity - it's a big, bad mil-spec battery ready for any application. I ran this battery for 5+ hard years!
- Category Super Heavy Duty / Marine
- Ahr (amp hours) @ 20 hr. rate 68 Ahr
- Pulse Discharge (HCA)
- 5 sec. 1700 A
- 10 sec. 1540 A
- 20 sec. 1355 A
- HCA @ 80ºF (27ºC) 1325 A
- CA @ 32ºF (0ºC) 1175 A
- CCA 875 A
- Reserve Capacity @ 25 A 142 min.
- Cycle Life (Deep cycle capability) 400 @ 100% DOD (depth of discharge)
- 500 @ 80% DOD
- Temperature Range -40ºF (-40ºC) to 176ºF (80ºC)
- Resistance at 1 kHz @ 77ºF 3.5m Ω
- Short circuit current 3500 A
- Terminals SAE combination post with 3/8” top thread
- 3 year full warranty
- Rugged Drycell sealed design
- Military grade
- Vibration resistant
- 60% more starting power
- Deep discharge reserve power
- 2 year storage life
- 8-12 year design life
- Can be mounted in any orientation
Update March 2012
The Odyssey finally started having trouble holding a charge after many, many discharges and was only holding about half a charge... 5+ years of hard use and abuse is pretty good in my book considering my power needs and the trips it had been on as the only battery in the vehicle prior to my dual battery upgrade. So, it was time to replace her with a new battery. For this lifecycle replacement I have chosen the Sears Die Hard Platinum Marine Group 34M for it's sealed AGM construction and great specs. $199 OTD at my local Sears compared to $370+ for a replacement Odyssey. I saved about 10 lbs too by going a bit smaller.
Sears Die Hard Platinum Marine Group 34M Specs:
- 3-year FREE Replacement Limited Warranty
- 880 Cold Cranking Amps – Provides power for RVs, trolling motors, marine accessories, and starting needs in all weather conditions, due to the use of 99.99% pure virgin lead plates and tin-coated brass terminals
- 135 Minutes of reserve capacity - Ideal for multiple electronic accessories
- Deep discharge recovery – Ideal for marine & deep cycle applications
- Combination stud/post terminal design – for multiple connections
- Longer off-season storage time – Ideal for boats
- AGM (Absorbed Glass Mat) construction - Provides mounting flexibility & guarantees longer service life
- Worry and maintenance-free operation - High purity grade acid held safely in place by glass mats makes a non-spillable design that gives mounting flexibility
- Military-grade construction & proven vibration resistance – Offers superior vibration resistance
DELTRAN BATTERY TENDER PLUS
Since the truck is not my daily driver anymore (long commute) I needed a way to keep my batteries topped off while the truck was sitting. With almost $500 worth of batteries in the truck it was worth investing in their upkeep. My research led me to the tried and true Battery Tender Plus from Deltran.
The Battery Tender Plus is a 1.25 amp battery charger designed to fully charge a battery and maintain it at proper storage voltage without the damaging effects caused by trickle chargers. It features a maximum output charging current of 1.25 amps. Red & green lights alternately flash for reverse polarity, when the battery is sulfated or if the battery terminals or corroded. The E-Z quick disconnect harness allows you to leave the charger wiring attached to the battery while operating the vehicle. A major selling point for me was the fact that the Battery Tender Plus will not overcharge or boil a battery when connected long term.
- Temperature compensated to ensure optimum charge voltage according to ambient temperature (Temperature Range: -20F to 120F).
- Automatically switches from full charge to float charging mode.
- Battery Tender at 1.25 amps will charge as fast or faster than any 3 amp charger available.
- Reverse Polarity Protection to ensure user safety. Red & Green Lights Alternately Flash in this condition.
- Complete, 4-step charging program:
- Qualification
- Bulk Charge — Red light on, green light off. Constant current = 1.25 amps. Transition to absorption charge when battery voltage reaches 14.4 VDC.
- Absorption Charge — Red light on. Absorption voltage = 14.4 VDC. Transition to float charge when battery charging current drops below 0.1 amp or until 6 to 8 hours have elapsed.
- Float Charge — Red light off, green light on. Float voltage = 13.2 VDC. If an external load is applied to the battery while the charger is in float charge, and if the battery voltage drops below a range between 12.0 to 12.5 VDC, then the charge cycle restarts.
- BTP microchip technology virtually eliminates battery destroying sulfation.
- Built-in 72 hour timer will protect a marginal battery from over charging.
TROUBLESHOOTING:Neither of the charger status indicator lights turn on
- Disconnect the charger AC power plug from the AC outlet and recheck that the battery charger alligator lips or ring terminals are connected to the correct polarity battery terminals and that they are making a clean, tight connection.
- Check to make sure that the AC outlet is supplying power by plugging in another appliance like a lamp, or check the outlet voltage with a voltmeter (e.g. multimeter).
- The battery may be defective. Take the battery to a local shop to be tested.
- The electrical connections between the charger and the battery may not be completely secured.
- This is NORMAL OPERATION for the Battery Tender Plus.
- Whenever AC power is removed from the charger, including momentary AC power outages, the charge cycle resets. Therefore, the battery charge current either has to drop to below 0.1 amp or 6 to 8 hours must elapse before the green light stops flashing.
- Again, this is NORMAL OPERATION for the Battery Tender Plus.
- There has been a momentary AC power outage that reset the charge cycle.
- There is some other load or appliance drawing power from the battery. When the battery voltage drops below 12.0V to 12.5V, the charge cycle resets.
NOTE: The Battery Tender Plus works with traditional wet cell batteries as well as AGM and Gel Cell batteries.I hard wired the included pigtail to the trucks starting battery after lengthening the wires by about a foot so that the plug could extend through the grill for hassle free charging without having to open the hood and the included OEM fuses on the power lead ensures safety. The Battery Tender Plus works great in conjunction with the National Luna Power Pack since both batteries can be topped off from this one easy exterior connection at the grill.Simple, bullet proof design with no buttons to push or settings to think about - just plug it in and it does the rest on it's own without user input or worry. At about $50 it's really cheap insurance for really expensive batteries.
80 WATT SOLAR PANEL
I waited a while to get a solar panel because the technology, and the price, was rapidly evolving. It was also a major rabbit hole - start researching solar options and you'll find yourself facing a dizzying array of brands, quality and pricing. While at Overland Expo in 2012 I saw some VERY nice 80 watt solar panels from Engel but the pricetag of almost $1k scared me off as I could get a very nice Power Film 60 watt panel from Adventure Trailers for less than that.
It's a good thing I kept looking because as we walked around more I ran into the owner of a small solar power and LED lighting booth - Adventure Power based in San Diego. He had kits that were nearly identical to the Engel 80 watt mono crystalline panel kits with a built in charge controller (right down to the nice padded transport bag and 15 ft cord) for a show special price of $400 out the door.
I ran back over to Engel and yep, basically the same panel so I went back over to Adventure Power and talked to him. Convinced that the panels came from the same place in China, I picked one up and have been pretty happy with it - just make sure you hard wire the leads and add a 5 watt FUSE for safety if you get one of these.
The 80 watt panel makes more than enough power when I am in camp. Since the Engel MT-45 fridge/freezer in the FlipPac draws a maximum of 2.5 amps on high/freezer settings. I can run it for days in camp and still have a power surplus i.e. keeping the house battery topped off. This panel can also be connected to your starting battery if need be so it's a great "plug and play" solution to your power needs.
Last edited:
We've endured a few cold nights in the camper in places like Death Valley where temperature changes from day to night can be severe. As a result of these experiences I've been looking for a safe way to extend our family camping season year round by making the camper more comfortable in the winter.Enter the Heatsource 2000 from Propex.
Sold in the US by Adventure Trailers the Heatsource 2000 is a highly efficient Propane Forced Air Heater. Air for combustion is taken from outside and passed into the combustion chamber having been mixed with gas during three aeration stages, it is ignited automatically and heats up the large surface area of the heat-exchanger. The Heatsource units are totally room sealed and exhaust all products of combustion externally through the 22mm stainless steel flue pipe. To add to the efficiency, cabin air can be re-circulated in preference to using cold air from outside. The heater can be used to heat ground tents, roof tents, RV's, vans, or truck beds and can be hard mounted. AT also sells a portable version of this same heater, the "Hot Box". Propane is attached to the unit via a fast disconnect fitting with a built in one way valve, and the blower is powered by 12V. A thermostat is provided for temperature control.It's a compact light weight solution for cold weather camping, or just taking the chill off the air before you go to bed or get up in the morning. Cold in the middle of the night? Just turn the dial up on the thermostat.
Details:
- Runs on clean burning propane
- Quiet thermostatic operation
- Stainless steel burner and heat-exchanger gives maintenance free durability
- Low electrical current consumption
- Compact and easy to install
- Fast warm-up time
- Reduces condensation
- High quality motor with ball race bearings
- Advanced micro-processor electronics
- Self diagnostic fault finding system
- Digital timer thermostat available
- HS 2000 is rated at 6483 BTU’s
- Runs at 91% efficiency
- Current draw: 1.4 amps during fan use
- Puts out 60 cubic feet of air a minute
- Measures 12.6" long x 6.8" wide x 3.9" tall
- Operating at 6483 BTU's, it will run 3.2 hours on 1 lb. of propane with thermostat on highest setting.
It is supplied with a solid state electronic thermostat which automatically switches the unit on and off to maintain the desired temperature. When the camper temperature drops below the selected level, the Heatsource will automatically ignite and run until the camper reaches the selected temperature. There is minimal electric current consumption during ignition so cycling the Heatsource on and off does not place an excessive drain on the battery, and thermostatic temperature control ensures efficient use of your finite propane supply.
AT also sells a portable, plug and play version of the Propex called the "Hot Box"
HEATSOURCE 2000 HEATER FLIPPAC INSTALL
After getting the heater the first order of business, as with any ultra-lightweight camper modifications, was to find a suitable place to mount the heater. With space at a premium and tight tolerances I had to find a way to make it work within my existing cabinetry.
Luckily, I had a perfect sized storage compartment just forward of my fridge that I was able to modify with a minimum of frustration. First I built a small shelf to allow plenty of ventilation and clearance all around for the heater and it's exhaust flue and then laid out the template for final placement. Note that the shelf does not go all the way forward (left) allowing a large breathing area to be made that ensures plenty of intake airflow from all directions.
Searching the internet for examples I saw some fairly scary looking installs so I was determined to ensure that my install was SAFE and as hidden as possible - no loose wires, no chance of abrading gas lines or wiring and proper ventilation. Using grommets when passing through metal and sheathing wires with split loom is critical to avoid electrical fires thus their widespread acceptance in the auto industry. Below are two examples of how I did NOT want my install to look:
Once the holes had been drilled for the intake and exhaust ducting below the heater it was time to drill more holes for breathability and the all important heater outlet venting into the camper's interior. I wanted to ensure that there was an excess of ventilation for safety and efficiency.
Now that I had ensured plenty of curculation and done a test fit of the heater inside the compartment it was time to mount it and address the intake and exhaust flues under the heater. These needed to go through the floor of the bed and outside so that all intake and exhaust functions are performed OUTSIDE the living compartment. This is what sets this heater apart from others and makes it so safe to use in small spaces. Careful attention was given to clearances of both the heater box itself and the intake/exhaust flues so that there could be no chance of contact with anything other than steel.
Once the heater was securely mounted and a minimum clearance between the heater and walls of 25mm on all sides had been met, all bare wood was primed and painted to ensure longevity. Next on the list was to connect the wiring and route the intake and exhaust flues. There are two sets of wire looms provided, a 5 wire loom for the thermostat and a 2 wire loom for power.Careful attention must be given to safety at this point, disconnect the battery and ensure that all connections are properly made before re-connecting power for a test run of the heater.Open the Propex case, connect the 5 wire harness plug to CN 27. Connect the 2 wire harness plug to CN24 and use the provided rubber grommets to route the wires through the slots as shown. Close the Propex case.
I utilized split loom along the entire length of these looms to prevent any chafing while underway and routed them carefully to their destination ensuring that they were secured with plastic clamps at regular intervals. Once connected to 12v power at the camper's Blue Sea fuse block, I set the 5 amp fuse aside until I was ready to test run the unit.
Next, I ran the 5 wire loom to the location I had selected for the thermostat. The manufacturer states that somewhere between waist and shoulder height is ideal for sensor placement. The highest point that I could mount the thermostat within the closed FlipPac shell was directly above the forward LED light fixture/12V hub. I fabricated a small mount and once the wires were installed I re-assembled the thermostat and hard mounted it in this protected location. This is a great spot because the light switch and thermostat can be reached from the sleeping area at night without getting up.
To install the thermostat, remove the rheostat knob and the two small phillips screws and remove the cover. Exposing the circuit board, run the 5 wire loom through the provided hole in the back and attach the power and thermostat wires: Red and black to positive and negative terminals; green, orange and white wires to the thermostat control terminals as pictured here.
Left = Heater On
Middle= Off
Right= Fan Only, no heat
*The rheostat controls the temperature.
Next up was routing the intake and exhaust flues, see below for intitial fitment and some trial and error. I had to adjust the size of the hole through the bottom of the cabinetry several times due to clearances under the truck and needing to avoid contact with the frame, vehicle exhaust and other structures. I wanted to ensure that I only cut holes through the floor of the truck bed once!
Take your time here as the intake and exhaust flue ports need to be placed where they avoid contact with the frame, wiring or any other components. They need to be located where they can be sealed and protected from road hazards like water, mud or stones. Carefully ensure that you will not drill into anything that you do not intend to by taking several looks and careful measurements from both inside and outside the vehicle before drilling!
Carefully route and connect each flue through the new port in the bulkhead and to the heater. Secure with hoseclamps and ensure that you use a high temperature grommet or high temperature RTV and washers as shown.
In typical overkill fashion, I used copious amounts of 700 degree RTV silicone and reducing washers - the exhaust will NEVER get that hot but I wanted to do it right the first time and ensure durability.
NOTE: Reducing washers and 700 degree RTV silicone were used top and bottom for a "sandwich" effect at each port to ensure that no water/dust/fumes can enter the living compartment. This also acts as an insulator for the exhaust flue (silver flue pictured above). It will never reach even 300 degrees BUT it will get quite hot with the heater on full blast so careful consideration should be given when installing, routing, and sealing this most important part of the system!Flue routing under the vehicle:
HEATSOURCE PROPANE SUPPLY
NOTE: Be sure that you use "pipe dope" and test ALL fittings for leaks before you use the heater. Ensure that copper lines, if used, are properly fitted using compression fittings with olives. Here's what I used:
Mounting, wiring and intake and exhaust concerns addressed it was time to attach the all important propane lines to the unit. The Manufacturer recommends 1/4 inch copper hard line at the heater so this is what I did. Downstream I converted this to a flexible high pressure hose to the two-stage regulator and on to the the propane tank mounted on the rear swingout.
I will be adding a battery powered carbon monoxide detector to the FlipPac as an added layer of safety. Heater fuel source is externally mounted via the Adventure Trailers aluminum propane bracket, sized to fit a 10 lb. propane tank. Compact and light weight, future plans include plumbing the propane tank for a second line for accesories like BBQ grills etc.
Last edited:
")
Some cool new innovations on the way from the guys at BirdDawgIndustries.com - waiting to be mounted on my FlipPac so stay tuned!
http://www.birddawgindustries.com/home.html

http://www.birddawgindustries.com/home.html
Last edited:

While we were leaving Overland Expo, Trump sabotaged the FlipPac by snapping off one of the supports hoping I'd tap out on our Utah trip. Luckily, Tango had some JB weld and we were able to keep going despite Trumps best efforts at derailing the trip..

You can see here where Trump broke it on purpose, not the alignment of the OEM plastic bit and Tango's generous contribution of JB weld that foiled Trump's nefarious scheme.

Here is the far end of the same rod, aluminum tube is 25 inches long (26.5 from eye to eye), note alignment/rotation of the plastic end and rivet location. This will be addressed later during this mod.

On a serious note, the shell has been on the truck since 2009 so no doubt there is some UV degradation of these OEM plastic bits. Luckily, the guys at BirdDawgIndustries are brewing up a serious upgrade to replace all the plastic bits with METAL... stay tuned!
You can see here where Trump broke it on purpose, not the alignment of the OEM plastic bit and Tango's generous contribution of JB weld that foiled Trump's nefarious scheme.
Here is the far end of the same rod, aluminum tube is 25 inches long (26.5 from eye to eye), note alignment/rotation of the plastic end and rivet location. This will be addressed later during this mod.
On a serious note, the shell has been on the truck since 2009 so no doubt there is some UV degradation of these OEM plastic bits. Luckily, the guys at BirdDawgIndustries are brewing up a serious upgrade to replace all the plastic bits with METAL... stay tuned!
Last edited:
woody
Adventurist
Bad news.... SLO isn't making the Fiamma inclosures anymore, seems everyone wanted a custom one and they deemed it unprofitable. Further they kept no records of yours so unable to replicate any ideas? Noticed you had a hand drawn sketch but I can't locate that post as it's not with this thread. Any chance of a repost or location? Thanks


A quick update here:
1. Bird Dawg Industries is working on a few things in the background for FlipPac upgrade parts, my kit will arrive soon and be documented here.
2. I will be working with Goose Off Road on an entirely NEW interior module for the FlipPac and if things work out, you'll be able to check it out at Mountain Rendezvous - they may even be available for order")
Stay tuned!
1. Bird Dawg Industries is working on a few things in the background for FlipPac upgrade parts, my kit will arrive soon and be documented here.
2. I will be working with Goose Off Road on an entirely NEW interior module for the FlipPac and if things work out, you'll be able to check it out at Mountain Rendezvous - they may even be available for order
Stay tuned!
Last edited:
Researching RV toilets, the Thetford 135 is a solid choice for a compact unit, but the newer 550P holds more and features a piston driven flush vice the older bellows style. I think we're going to upgrade to the 550P for this new build.
4 gallons of fresh water, 5.5 gallon holding tank. Pour out spout can be used to drain anywhere. Super simple, reliable, and perfect for a family on the go. $137.10 with free shipping via Amazon as of 8/31/14


http://www.thetford.com/tabid/883/Default.aspx
Shows a different model, but the way these work is pretty much the same throughout the product line.
[video=youtube;w0lJ6FbmdCM]https://www.youtube.com/watch?v=w0lJ6FbmdCM#t=36[/video]
4 gallons of fresh water, 5.5 gallon holding tank. Pour out spout can be used to drain anywhere. Super simple, reliable, and perfect for a family on the go. $137.10 with free shipping via Amazon as of 8/31/14
This durable large capacity Porta Potti allows maximum uses before emptying the 5.5 gallon holding tank. The high gloss finished 550P features a piston pump for positive water pressure flush rinsing of bowl. Exclusive no-splash pour spout (model 92853 only) keeps the process of emptying to household sewer systems clean.
Built in deodorant storage with sealed valve to keep odors inside the holding tank keeps smell to a minimum when compared to traditional holding tanks systems. Easy to read level gauge let's you know when nearing full capacity. The 550P features a removable lid and seat for easy cleaning.
THE-92856 - includes hold down kit. THE-92853 - does not include hold down kit (THE-92922).
DIMENSIONS:
High Profile
A 16-1/2" : 41.9 cm
B 16-1/2" : 41.9 cm
C 15" : 38.1 cm
CAPACITIES:
Fresh Water: 4.0 gal: 15L
Waste Tank: 5.5 gal: 21L
Average Flushes: 56
http://www.thetford.com/tabid/883/Default.aspx
Shows a different model, but the way these work is pretty much the same throughout the product line.
[video=youtube;w0lJ6FbmdCM]https://www.youtube.com/watch?v=w0lJ6FbmdCM#t=36[/video]
Last edited:
Meanwhile, one of the weak links in the OEM design of the FlipPac has been dealt with el permanente. Short of det cord, these new prop rods and hardware from BirdDawg Industries are sure to foil any future attempts at sabotage. Mongo will not break these either... 

Last edited:
The new prop rods and hardware arrived from Bird Dawg Industries - very impressed with these as I doubt we'll have to replace them ever again. The new branch deflectors are a nice addition as well since I no longer have to worry about them getting snagged on anything. No more worries about UV degradation on cheap plastic bits!
I hear they're working on a full torsion bar delete kit that will use these same prop rods
http://www.birddawgindustries.com/home.html


I hear they're working on a full torsion bar delete kit that will use these same prop rods
http://www.birddawgindustries.com/home.html
The new branch deflectors are a nice addition as well since I no longer have to worry about them getting snagged on anything. No more worries about UV degradation on cheap plastic bits!
View attachment 8926
When you first showed these off my concern was "Bullet proof hardware" just means ripping it out of the fiberglass. I was already thinking along the lines of the branch deflector but alas... They beat me to it! Good job!
- Status
- Not open for further replies.