Aaron
Adventurist
Tacoma Hot Water Shower
As promised to the one known only as "Dave," here is my shower install:
With all the camping that I like to do, there was no way that I wouldnt have the ability to take a warm shower or to hot wash dishes. I checked around online through ExPo and IH8Mud at what everyone else had done, and borrowed their ideas. But in the end, I like what Kurt was selling over at Cruiser Outfitters http://www.cruiseroutfitters.com/helton.html
I ordered the HW1 which comes with the 12v water pump, shower kit, and the heat exchanger system. Install is really basic, and the hardest part is finding a spot to install the heat exchanger.
This install should work fine on most Toyotas similar to the Tacoma and my install is on an 2011my.
First things first, check all your parts in the shipment to make sure you received whats on the manifest. You dont want to be deep into this and find out you're missing something. Next: find a place to install the heat exchanger. I found suitable space on the passenger side firewall behind the ABS manifold.
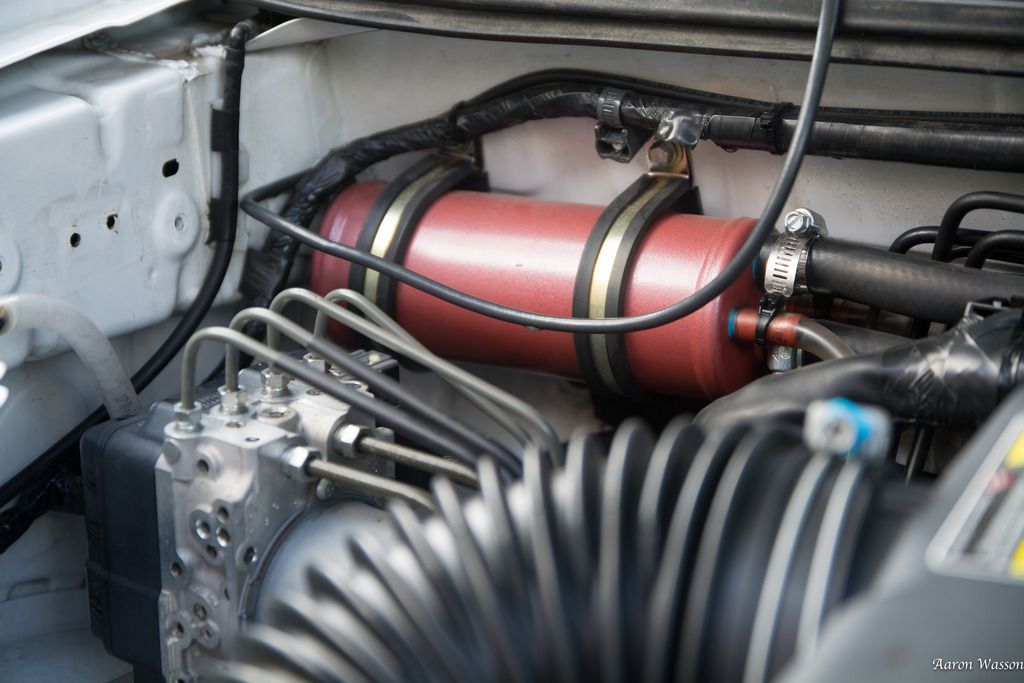
Check and double check your clearance before screwing into the sheet metal, and make sure you arent going to cut something vital. I would also recommend that you install all your hoses prior to fully attaching the exchanger to the wall. Once its installed, you wont be able to get to the inlets/outlets. Another thing to note is that there is a size difference between the nipples on the exchanger. The larger inlets/outlets are for the coolant to pass through from the engine, while the smaller ones are for your water.
When your hoses are in place and the exchanger is mounted, you will need to tee into the coolant system. In the shipment from Cruiser Outfitters, you should have received two tees and a ball valve. The tees allow you to add the exchanger inline between the heater core inside the cab while the ball valve is to allow you to limit the amount of coolant the exchanger receives.
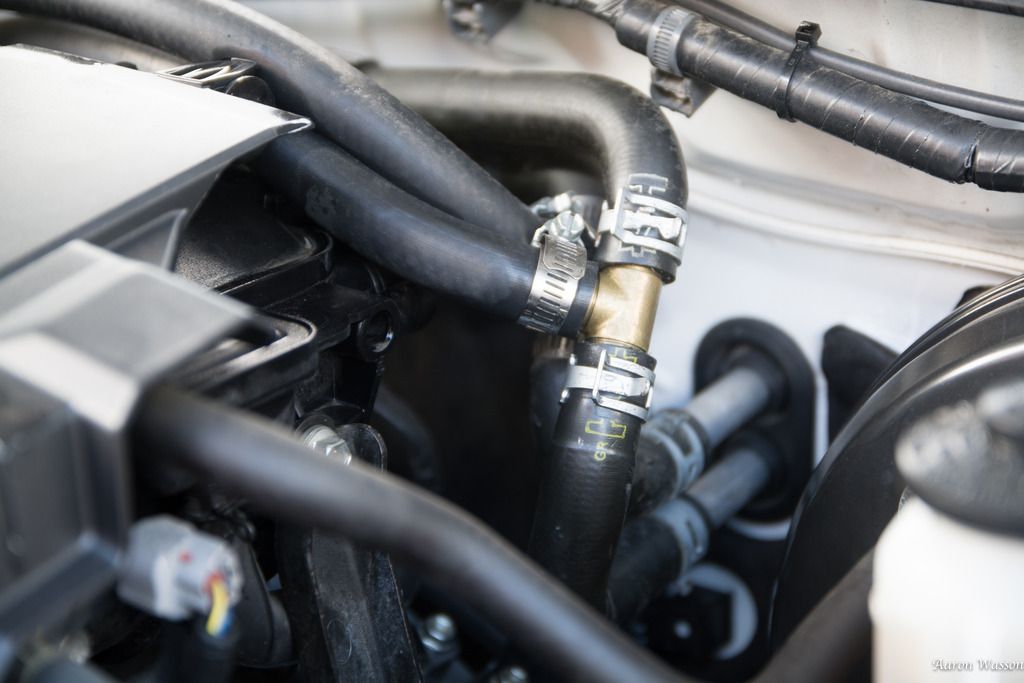
One of the tees will be easy since there is a connector already in place that will need to be swapped, and the other tee will need to be added. Expect there to be coolant loss when doing this. When the tees are in place you can connect the hoses from the exchanger inline. You will have air in the system lines so expect there to be temp issues until its all burped out.
The ball valve that is shipped with the kit is entire up to you to install. I have mine in place, but I haven't found it to be helpful in controlling the water temperature.
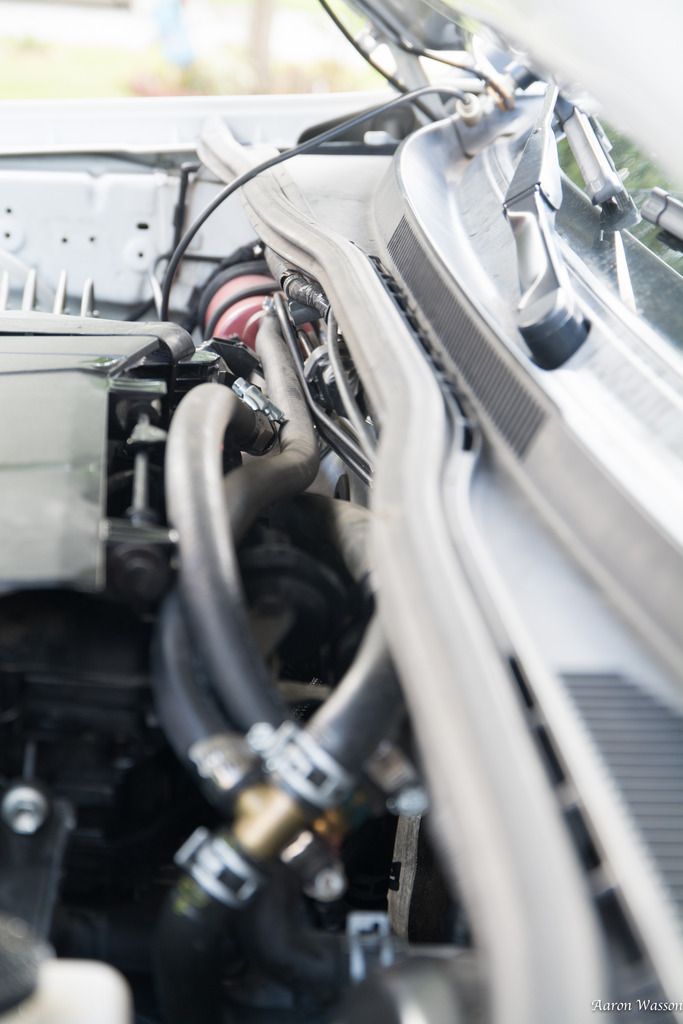
Here are the coolant hoses running behind the engine cover (I haven't seen anything melt from the temp yet, and the system has been in for a while)
Here is where my system differs from the normal kit. If you just have the system from Cruiser Outfitters, you will need to find a place to install the inlet/outlet bracket, connect the hoses and you are done. Mine was that way originally, but I wasn't happy with the huge temp swings from the system. Ive been burnt...
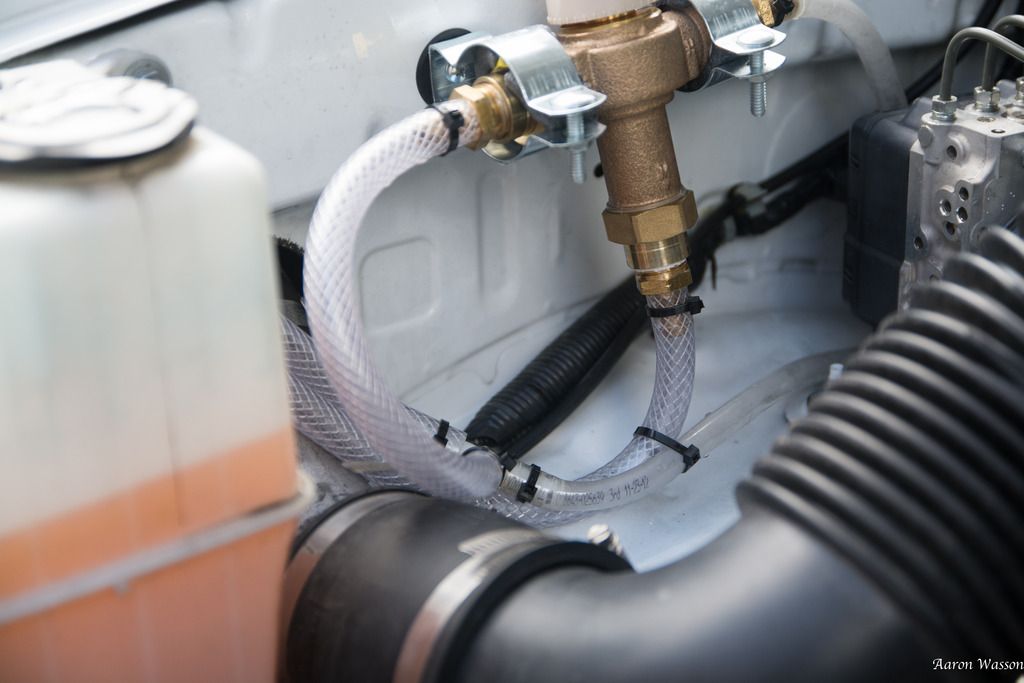
I pulled the bumper bracket loose from the firewall and ordered a few more parts. First up, temp control. This is a Watts Thermostatic Mixer valve. Its the same basic principle as the temp control for your shower in the bathroom.
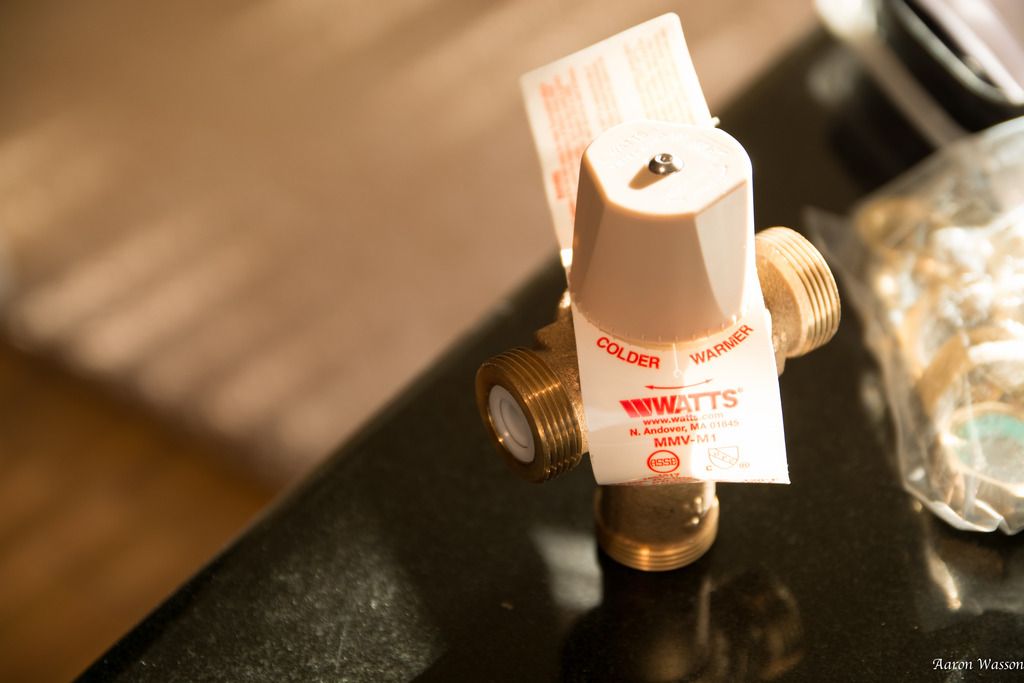
It lets you set the temperature that you want, and it will stay as close as it can. No more wickedly hot water. I originally tried to control the temp with the ball valve, but never found it to help.
When I first installed the shower system, I would circulate the water in a bucket till it reached a good temperature, then take a shower. But, when the water sits in the exchanger, it gets hot, really hot...
The mixer has three connections (cold in, hot in, mixed out) and the temp control knob. On the front of the truck I have only a water inlet, outlet and a 12v outlet. The water inlet is teed off and goes to both the mixer and the exchanger. Then hot water comes back from the exchanger to the mixer, then back to the front of the truck to the outlet.

The front of the truck was the result of another necessary tweak to the system. Basically I wanted to be lazy and not need to flip down my UHF antenna, open the hood, connect the shower... blah blah blah. So I did this:
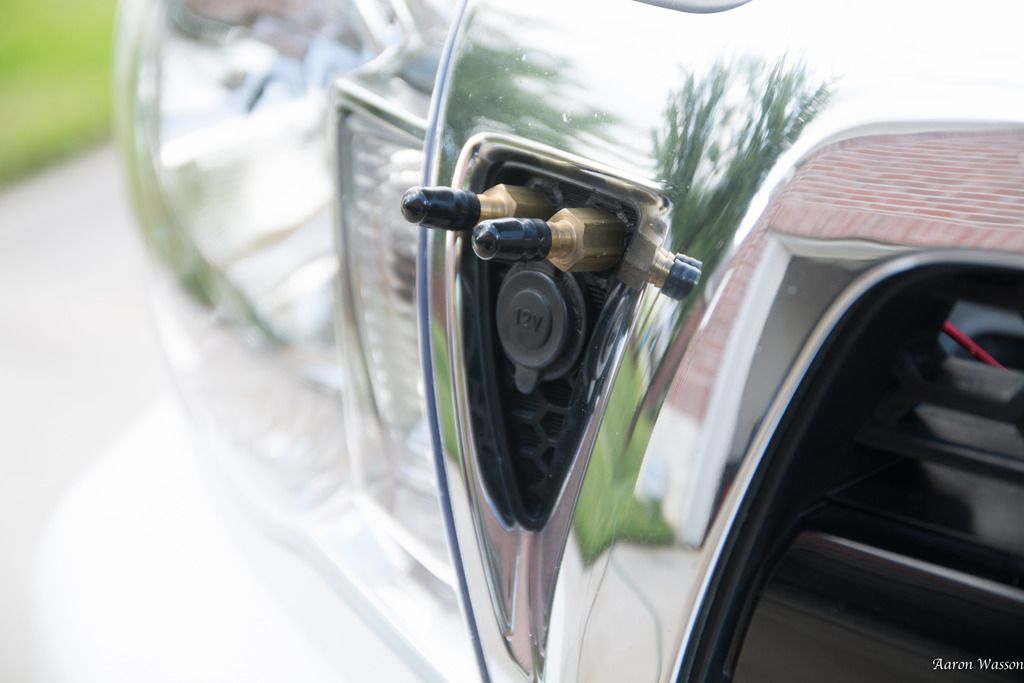
A few hours of Dremel work, and some test fitting and I had it working. The top two nipples are the cold water in, and the mixed water out. They are the same connections that come with the Cruiser Outfitter kit. The bottom connection is the 12v outlet that I added myself. I dont have the exact model number, but its a Blue Sea outdoor connection. Power for it runs back to a Blue Sea distribution panel on the driver side.
Now every time I need hot water, I just hook up the pump and kick the engine on!
Side note. Im not too happy about the pump that come in the shower kit. Ive used it maybe 10 times and its done. The pump itself has rusted and locked up. Im sure I could have been a bit more diligent on maintaining it, but it should have survived longer. After each use, I would take it out of the water and leave it hanging up to drain out. Ill need to figure out that section soon so I can get back to using it all.
As promised to the one known only as "Dave," here is my shower install:
With all the camping that I like to do, there was no way that I wouldnt have the ability to take a warm shower or to hot wash dishes. I checked around online through ExPo and IH8Mud at what everyone else had done, and borrowed their ideas. But in the end, I like what Kurt was selling over at Cruiser Outfitters http://www.cruiseroutfitters.com/helton.html
I ordered the HW1 which comes with the 12v water pump, shower kit, and the heat exchanger system. Install is really basic, and the hardest part is finding a spot to install the heat exchanger.
This install should work fine on most Toyotas similar to the Tacoma and my install is on an 2011my.
First things first, check all your parts in the shipment to make sure you received whats on the manifest. You dont want to be deep into this and find out you're missing something. Next: find a place to install the heat exchanger. I found suitable space on the passenger side firewall behind the ABS manifold.

Check and double check your clearance before screwing into the sheet metal, and make sure you arent going to cut something vital. I would also recommend that you install all your hoses prior to fully attaching the exchanger to the wall. Once its installed, you wont be able to get to the inlets/outlets. Another thing to note is that there is a size difference between the nipples on the exchanger. The larger inlets/outlets are for the coolant to pass through from the engine, while the smaller ones are for your water.
When your hoses are in place and the exchanger is mounted, you will need to tee into the coolant system. In the shipment from Cruiser Outfitters, you should have received two tees and a ball valve. The tees allow you to add the exchanger inline between the heater core inside the cab while the ball valve is to allow you to limit the amount of coolant the exchanger receives.

One of the tees will be easy since there is a connector already in place that will need to be swapped, and the other tee will need to be added. Expect there to be coolant loss when doing this. When the tees are in place you can connect the hoses from the exchanger inline. You will have air in the system lines so expect there to be temp issues until its all burped out.
The ball valve that is shipped with the kit is entire up to you to install. I have mine in place, but I haven't found it to be helpful in controlling the water temperature.
Here are the coolant hoses running behind the engine cover (I haven't seen anything melt from the temp yet, and the system has been in for a while)

Here is where my system differs from the normal kit. If you just have the system from Cruiser Outfitters, you will need to find a place to install the inlet/outlet bracket, connect the hoses and you are done. Mine was that way originally, but I wasn't happy with the huge temp swings from the system. Ive been burnt...
I pulled the bumper bracket loose from the firewall and ordered a few more parts. First up, temp control. This is a Watts Thermostatic Mixer valve. Its the same basic principle as the temp control for your shower in the bathroom.

It lets you set the temperature that you want, and it will stay as close as it can. No more wickedly hot water. I originally tried to control the temp with the ball valve, but never found it to help.
When I first installed the shower system, I would circulate the water in a bucket till it reached a good temperature, then take a shower. But, when the water sits in the exchanger, it gets hot, really hot...
The mixer has three connections (cold in, hot in, mixed out) and the temp control knob. On the front of the truck I have only a water inlet, outlet and a 12v outlet. The water inlet is teed off and goes to both the mixer and the exchanger. Then hot water comes back from the exchanger to the mixer, then back to the front of the truck to the outlet.


The front of the truck was the result of another necessary tweak to the system. Basically I wanted to be lazy and not need to flip down my UHF antenna, open the hood, connect the shower... blah blah blah. So I did this:

A few hours of Dremel work, and some test fitting and I had it working. The top two nipples are the cold water in, and the mixed water out. They are the same connections that come with the Cruiser Outfitter kit. The bottom connection is the 12v outlet that I added myself. I dont have the exact model number, but its a Blue Sea outdoor connection. Power for it runs back to a Blue Sea distribution panel on the driver side.
Now every time I need hot water, I just hook up the pump and kick the engine on!
Side note. Im not too happy about the pump that come in the shower kit. Ive used it maybe 10 times and its done. The pump itself has rusted and locked up. Im sure I could have been a bit more diligent on maintaining it, but it should have survived longer. After each use, I would take it out of the water and leave it hanging up to drain out. Ill need to figure out that section soon so I can get back to using it all.
Last edited:

