2018 Lexus GX build

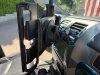
Of course to get my tablet to sit at the level I wanted (low) I needed to DIY my medium RAM mount arm. The RAM mount arms won’t sit 90 degrees of the opposite end. I drilled a .437 or 7/16 hole in the end, then notched it and filed it clean
2F1DC6C7-97D0-4737-805F-BE176CFDB607.jpeg
BFFF83BF-3EBC-47F7-AE6B-DDEB26A210E1.jpeg
7BFB36B5-0F63-4688-8697-892669BDDFE9.jpeg
 

Attachments

  • 7F0FE657-87BE-437B-AFD9-FFB338086034.jpeg
    7F0FE657-87BE-437B-AFD9-FFB338086034.jpeg
    646.9 KB · Views: 65
Last edited:
Expedition Essentials is a Washington based manufacturer of accessory mounts. The GX does not offer a great surface for clean DIY installations. A couple months ago they asked me to come by a test there prototype dash mount for the GX 460. Today they shot the installation video using my GX and was first to get my new mount.

View attachment 56292View attachment 56293View attachment 56294View attachment 56295View attachment 56296View attachment 56297

Looks clean! Appears that the RAM balls are in a track and can slide for adjustment? I like that over some other manufacturers mounts that have pre-spaced holes.
 
Spent last Thursday night and Friday in the Wenas DNR lands near Ellensburg WA. Solo sleep setup rocks. Nemo sleep pad and summer weight bag was plenty insulation and the Weather Tech window shade covers keep the early rising sun out!


Wenas1.jpg
Wenas 2.jpg
Wenas 3.jpg
 
Been a while since I've updated the rig build. Been enjoying it this summer so the mods have been put on back burner. The front bumper is still out by 2-4 weeks minimum.

We are heading to CO/UT in late September and after our Death Valley trip we knew we wanted some cover for showers and bathroom breaks. I've been eyeballing Alu Cabs 270 awning since we had them on our rental Land Cruisers in Namibia. They set up so easy that we would deploy them at every stop. After contacting Alu Cab and numerous other manufactures the only 270 awning that would be close in length to my roof length was the Rhino Rack short 270 awning. No offense to Rhino Rack owners but it is nowhere near the quality of the Alu Cab awning.

It was apparent in DV the gals wanted some cover, other than lugging the bucket up a wash until out of sight. When Dave posted up his En Suite installation I had to go back and watch 4X Overland videos of when ASPW installed his on his 70 series a few years back. So with the 270 awning out I purchased the En Suite.

Installing it where I wanted it will require custom brackets but I already had the material and what else do I have to do at work besides work on my own truck projects! I temporarily used some old brackets from another project to find my location. After choosing the location I set out bending up some .125" 5000 series aluminum for proof of concept. With brackets bent and gussets cut I'll be welding this up over the weekend.


En Sutie 1.jpg
En Suite 2.jpg
En Suite 3.jpg
 
Completed my En Suite brackets. My initial designed worked but like @Dave I needed to space the whole assembly out so I ordered some 2"x 2" square tube aluminum as a spacer. The GX is bulbous and I could actually use more spacing but then you run into sticking it way out in the wind and tree branches. I sprayed the brackets with Krylon but when I send my new front bumper in for powder coating these will get blasted and powder coated.


En Suite 4.jpg
En suite 5.jpg
En Suite 6.jpg
En Suite 7.jpg
 
Mounted the En Suite up added a rubber pad under each outboard attachment point to mitigate squeaking. One of my scene lights lines up and will work for night doody operations.

En Suite 8.jpg
En Suite 9.jpg
En Suite 10.jpg
En Suite 11.jpg
En Suite 12.jpg
 
Night light. This turned out well and won't interfere with my shovel access or scene light when the En Suite isn't deployed.

Field test will be conducted this weekend, main concerns are wind noise at freeway speeds and tree/brush contact on the trail.

En Suite 14.jpg
 
Using the En Suite, one thing I’ve learned is that staking it down helps a lot. Wind can be an issue with the bottom edge of the enclosure becoming unruly at inconvenient moments…

In rocky country like Moab etc where tent stakes die young, I use “Perfect Bungies” and loop them around soccer ball size rocks to immobilize the bottom of the En Suite and keep it square.
 
Neat build but I must have missed a turn somewhere...what happened to the front bumper?
Returning from a ski trip last January I crashed into a BMW and smashed it. I didn’t want another Ironman bumper so I waited for Victory 4x4 to come out with there GX bumper. I ordered it in early May. Hopefully it ships soon.
 
Attention!

If you are considering re gearing your Toyota product be aware Nitro Gear won’t have them in stock until late January for 4:56 and late December for 4:88.

So re gearing project is on hold.
 
A small project this weekend since I failed to get material for my air system upgrade.

My start battery terminals were not up to the rest of my electrical system and expectations. SDHQ is the manufacture of these and the covers, quality product.


What I started with...

bat term #4.jpg

Bat term #3.jpg


SDHQ terminals.

Bat term#2.jpg

bat term #1.jpg
 
It's been a long time coming..... In early May 2021 I put a Victory Strike full hoop bumper on order for the GX.
https://www.victory4x4.com/product/VGXFS-46.html

The times being what they are Victory stated 16 weeks counting working days only, AKA five months. In mid October the bumper arrived. I always order no powder coat as most shops have a low cost bidder, I may alter the product, damage in shipping and I want all my parts to match.

As I inspected the bumper, the welds and joint fitment were subpar, in fact I was shocked Victory shipped it. Immediately I contacted Victory by email with a plethora of pictures. They agreed and started production of a second bumper. The additional wait was 4 weeks, again working days so 5 weeks. December 2nd the second bumper arrived, nearly 8 months after paying in full. What a cluster F.

Vic junk #1.jpg
Vic junk #2.jpg

Vic junk#3.jpg
 
This is a hidden winch style bumper that uses the Hawse fairlead and hook/thimble/eyelet as a skid plate (many bumpers are designed like this, IDK why). Prior to purchase I knew I would be modifying the bumper ASAP to accommodate a roller fairlead.

With the second new bumper in hand I dropped off the bumper at the local weld shop with my template of what needed to be done. I came up with the mod on the bumper with the help of an engineering friend that understands the use and stresses involved.


VIC #1.jpg
VIC #2.jpg
VIC #3.jpg
 
Back
Top Bottom