
You are using an out of date browser. It may not display this or other websites correctly.
You should upgrade or use an alternative browser.
You should upgrade or use an alternative browser.
My 1967 M416 Build
- Thread starter Tim R.
- Start date
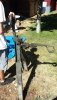
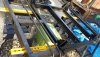
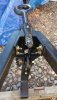
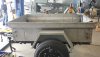
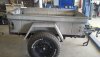
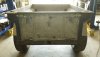
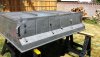
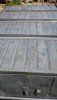
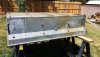
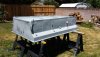
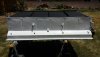
The tear down::: Overall the trailer was not in bad shape. It had quite a few dents but little rust and the bed only had one small pinhole. The previous owner had haphazardly cut a tailgate into it so I chose to keep it and square it up best I could.
Attachments
-
 20130625_095027_resized.jpg480.5 KB · Views: 127
 -
 20130625_095046_resized.jpg809.7 KB · Views: 126
 -
 20130625_095102_resized.jpg705.5 KB · Views: 115
 -
 20130625_095122_resized (1).jpg687.2 KB · Views: 109
 -
 20130625_095200_resized (1).jpg712.5 KB · Views: 111
 -
 20130625_100059_resized (1).jpg489.2 KB · Views: 112
 -
 20130625_100127_resized.jpg546.7 KB · Views: 113
 -
 20130625_100135_resized.jpg481 KB · Views: 128
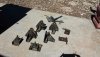
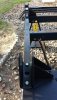
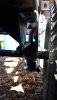
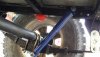
After I disassembled the trailer I took the parts minus the bed to get sandblasted and powder coated. I want the trailer to resemble the tow rig (My Tacoma) so I had the frame and parts done in black. While at the shop they added a 2" receiver in the rear of the frame for me. The receiver tube I purchased at Harbor Freight for like $10.00. I reassembled everything on the frame with Grade 8 hardware. Yes its probably overkill but its rather overkill than have a bolt break on the trail.
Attachments
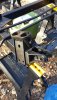
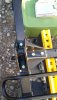
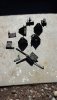
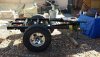
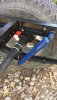
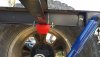
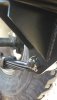
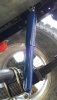
Thanks guys. Its been fun so far. The trailer frame and all mounts went together nicely. I originally purchased a set of stock NOS military leaf springs but they did not fit right along with one of the spring eyes were off round. So I purchased a different set from Omix-Ada and they fit like a glove. Purchased a set of Monroe shocks after comparing shocks and lengths. I purchased the shocks off of Amazon as NAPA wanted almost double for same shock. Bumpstops are universal fit from Energy Suspension. All the other pin, nuts and bolts I sourced from ACE Hardware and a local discount hardware store. The axle is custom from Redneck Trailer Supply and is 6 x 5.5 to match the Toyota lug pattern. The U-Bolts and Greasable shackles were generic I bought at Auto Zone. Here are some more pics--
Attachments
-
 20131114_102852_resized.jpg687.1 KB · Views: 127
 -
 20131114_103847_resized.jpg645.1 KB · Views: 110
 -
 20131114_103853_resized.jpg473.7 KB · Views: 111
 -
 20131114_103902_resized.jpg616 KB · Views: 119
 -
 20131114_103916_resized.jpg429.5 KB · Views: 107
 -
 20131114_104036_resized.jpg644.8 KB · Views: 111
 -
 20131114_104054_resized.jpg621.1 KB · Views: 115
 -
 20131114_104104_resized.jpg371.1 KB · Views: 113
 -
 20131114_104125_resized.jpg281.3 KB · Views: 116
 -
 20131114_144511_resized.jpg472.8 KB · Views: 121
 -
 20131114_144538_resized.jpg455 KB · Views: 113
Last edited:

") . The trailer is getting done piece by piece. I'll post more pics when I get home from work in a few days.
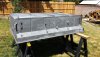
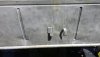
. The trailer is getting done piece by piece. I'll post more pics when I get home from work in a few days.You are correct about helo lift capabilities. This was a USMC version. Depot Maintenance plate stated it was serviced at MCLB Barstow in 1987. When the previous owner repainted it they did a horrible job. They painted over everything with the paint.Then when they cut the tailgate, they cut down through the rear data plate ruining it. I had a local company in Lancaster, Ca. Looks better than the eBay version in my opinion.(If you need a plate produced this company can make it happen & is veteran owned)
If I recall it is 2 3/8 as well. I purchased several sets off Amazon and others but most were wrong length. I believe these are 1/16th to wide but once I placed them into the plate and tightened the nuts then they gripped the axle perfectly. I'm not at home but will measure when I get back and let you know.
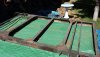
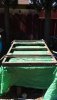
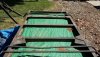
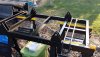
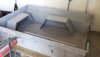
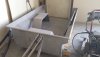
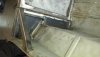
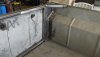
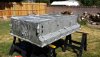
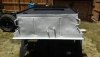
As promised here are some more pics of the build. Top couple pics are after I picked up the bed at the Sandblasting place a dropped it off with a fabricator acquaintance of mine (Kenny). Bed was then placed on frame and corners were reinforced with square tubing. The tailgate was framed and using the original steel plate was welded to the tailgate framework. Picked up some hinges and spring clasp for the tailgate down at Brocks Trailers in Bakersfield. Ken had his new welding apprentice do most of the work. The apprentice did great work. As you can possibly see I have swapped the Tacoma aluminum wheels for steel wheels from a Tacoma for a little more rugged look. Was great as I picked up the spares from people selling them for $50.00 each for tire and wheel. Hope you are enjoying these as much as im enjoying working on this little gem.
Attachments
-
 20140407_152919.jpg513.9 KB · Views: 122
 -
 20140407_152947.jpg532.3 KB · Views: 118
 -
 20140423_094800.jpg510.7 KB · Views: 107
 -
 20140423_094811.jpg576.2 KB · Views: 101
 -
 20140423_094824.jpg590.5 KB · Views: 106
 -
 20140423_094857.jpg644.9 KB · Views: 101
 -
 20140423_094903.jpg536.1 KB · Views: 101
 -
 20140423_094927.jpg527.8 KB · Views: 101
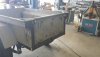
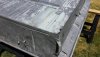
Here is after I brought it home from the fab shop/ Wanted to wash it down before painting. Put on some sawhorses and washed it with sop and water. I then gave it a bath in some metal etcher I picked up at Home Depot. If you look you can see the difference in the paint pre and post etching. I brushed the etching liquid after diluting it per directions (Note: dont be dumb like me-dont do it over your grass-i now have a bare spot in my back yard). Hmmm, fire pit project maybe??? Bottom picture is after it dried and I used compressed air to blow out excess water from all little holes. I then sprayed 2 coats of Rust O Leum self etching primer.
Attachments
-
 20140430_095932_resized.jpg716 KB · Views: 106
 -
 20140430_110817_resized.jpg657.3 KB · Views: 109
 -
 20140430_110824_resized.jpg581.4 KB · Views: 107
 -
 20140430_111215_resized.jpg609.3 KB · Views: 108
 -
 20140430_111223_resized.jpg511.8 KB · Views: 107
 -
 20140430_111229_resized.jpg437 KB · Views: 106
 -
 20140430_112955_resized.jpg637.7 KB · Views: 99
 -
 20140430_120150_resized.jpg486.3 KB · Views: 107
 -
 20140430_122139_resized.jpg574.3 KB · Views: 98
 -
 20140430_122438_resized.jpg957.4 KB · Views: 110
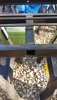
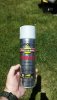
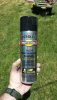
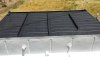
Last set until I get my camera back out for some new pics and after I install the brake lights. Painted the body with the Rust-O-Leum professional paint. I then rolled the bed with DIY bed liner I picked up at Harbor Freight for $45.00 for a gallon can. The gallon easily did handled 2 coats in the bed. Once that dried in the bed I sprayed 2 additional coats of spray bed liner. the underside was sprayed with 2 coats of spray bed liner then a coat of Rust-O-Leum flat black then 2 additional coats of spray on bed liner.
Attachments
Maxcustody
Adventurist
Looking good, great progress
Sent from my iPhone using Tapatalk
Sent from my iPhone using Tapatalk
What is the diameter of the axle? I had a hard time finding u-bolts for mine at 2 3/8s.
Measured- 2 3/8
Xpedition Outfitters
Adventurist
looks great....